Trong chương này, chúng ta sẽ nghiên cứu cách làm việc với các phần tử TextInput trong React Native.
Thành phần Home sẽ nhập và hiển thị đầu vào.
App.js
import React from 'react';
import Inputs from './inputs.js'

const App = () => {
   return (
      <Inputs />
   )
}
export default App
Input
Chúng ta sẽ xác định trạng thái ban đầu.
Sau khi xác định trạng thái ban đầu, chúng ta sẽ tạo các hàm handleEmail và handlePassword . Các chức năng này được sử dụng để cập nhật state (trạng thái).
Hàm login() sẽ chỉ cảnh báo giá trị hiện tại của trạng thái.
Chúng tôi cũng sẽ thêm một số thuộc tính khác vào kiểu nhập văn bản để tắt viết hoa tự động, xóa đường viền dưới cùng trên thiết bị Android và đặt trình giữ chỗ.
đầu vào.js
import React, { Component } from 'react'
import { View, Text, TouchableOpacity, TextInput, StyleSheet } from 'react-native'

class Inputs extends Component {
   state = {
      email: '',
      password: ''
   }
   handleEmail = (text) => {
      this.setState({ email: text })
   }
   handlePassword = (text) => {
      this.setState({ password: text })
   }
   login = (email, pass) => {
      alert('email: ' + email + ' password: ' + pass)
   }
   render() {
      return (
         <View style = {styles.container}>
            <TextInput style = {styles.input}
               underlineColorAndroid = "transparent"
               placeholder = "Email"
               placeholderTextColor = "#9a73ef"
               autoCapitalize = "none"
               onChangeText = {this.handleEmail}/>

            <TextInput style = {styles.input}
               underlineColorAndroid = "transparent"
               placeholder = "Password"
               placeholderTextColor = "#9a73ef"
               autoCapitalize = "none"
               onChangeText = {this.handlePassword}/>

            <TouchableOpacity
               style = {styles.submitButton}
               onPress = {
                  () => this.login(this.state.email, this.state.password)
               }>
               <Text style = {styles.submitButtonText}> Submit </Text>
            </TouchableOpacity>
         </View>
      )
   }
}
export default Inputs

const styles = StyleSheet.create({
   container: {
      paddingTop: 23
   },
   input: {
      margin: 15,
      height: 40,
      borderColor: '#7a42f4',
      borderWidth: 1
   },
   submitButton: {
      backgroundColor: '#7a42f4',
      padding: 10,
      margin: 15,
      height: 40,
   },
   submitButtonText:{
      color: 'white'
   }
})
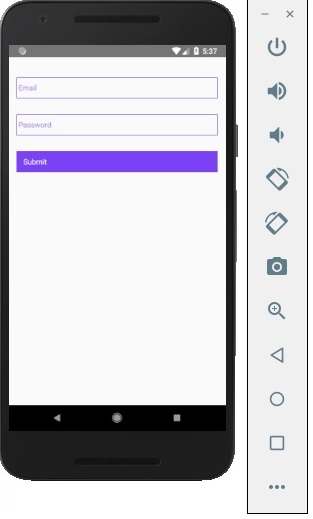
Bất cứ khi nào chúng ta nhập vào một trong các trường đầu vào, state (trạng thái) sẽ được cập nhật. Khi chúng tôi nhấp vào nút Gửi , văn bản từ đầu vào sẽ được hiển thị bên trong hộp thoại.